
Get started
Authentication
Rendley supports two authentication methods. The right one depends on whether your client can open a browser.
OAuth is the simplest option for most people. Add Rendley to your client, sign in when the browser opens, and approve access. The client stores the session, and you can revoke access later from your Rendley settings.
Use an API key for non-interactive environments, such as a server where nobody is available to approve a browser flow. Create the key in Rendley, then add it to the client’s configuration.
If your client supports OAuth, sign-in is usually simpler. Use an API key when you need non-interactive authentication or the client does not support Rendley’s browser flow. Keys have to be stored safely and rotated by you.
Signing in
Point the client at whichever endpoint you want:
https://mcp.rendley.com/mcp/automation   edits and exports on its own
https://mcp.rendley.com/mcp              prepares a project for you to review
For the complete file-to-video workflow, use /mcp/automation. It gives the client access to the editing agent, generative media, motion-graphics authoring, and export.
A Rendley tab opens. Sign in, approve access, and the client stores the session. Every request from that client runs under your account.
Claude lists the lighter endpoint in its connector directory, so you can add it by clicking Connect and approving access. The automation endpoint is not listed there and must be added as a custom connector. See Claude for the setup steps.
If you use both, sign in twice
Signing in to one endpoint does not sign you in to the other. They are separate connectors as far as your client is concerned, so add them as two entries with different names and approve each one.
If one connector works and the other reports that you are not authorized, sign in to the second connector separately.
Get an API key
1. Open API keys in settings
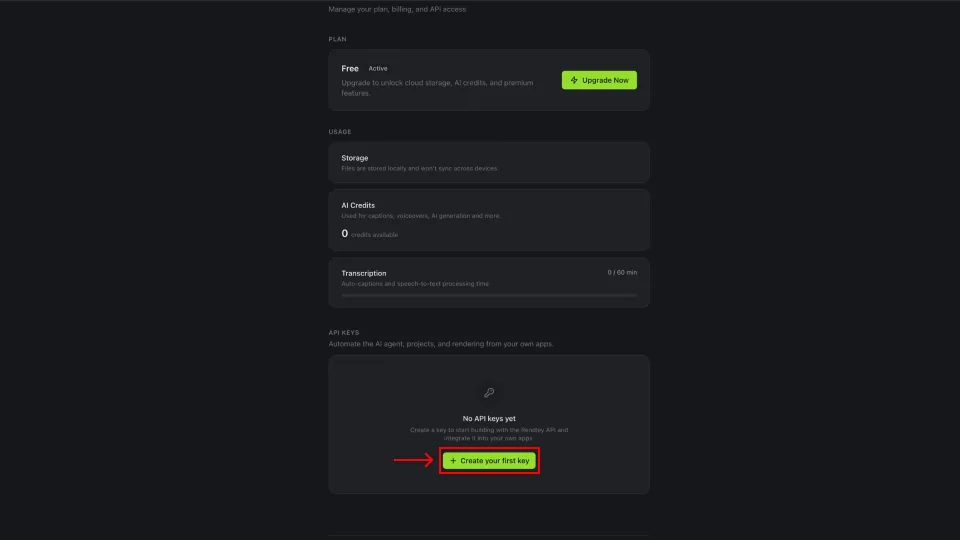
Sign in to Rendley and open Settings. Scroll to the API Keys section and click Create your first key, or New key if you already have one.
2. Name the key
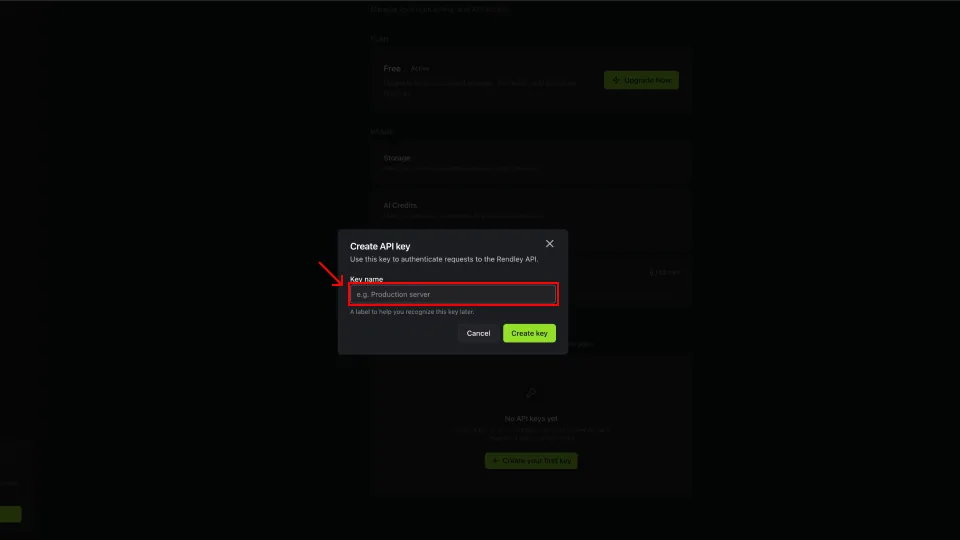
Give the key a label that tells you where it is used, like Codex CLI or Production server, then click Create key.
3. Copy the key
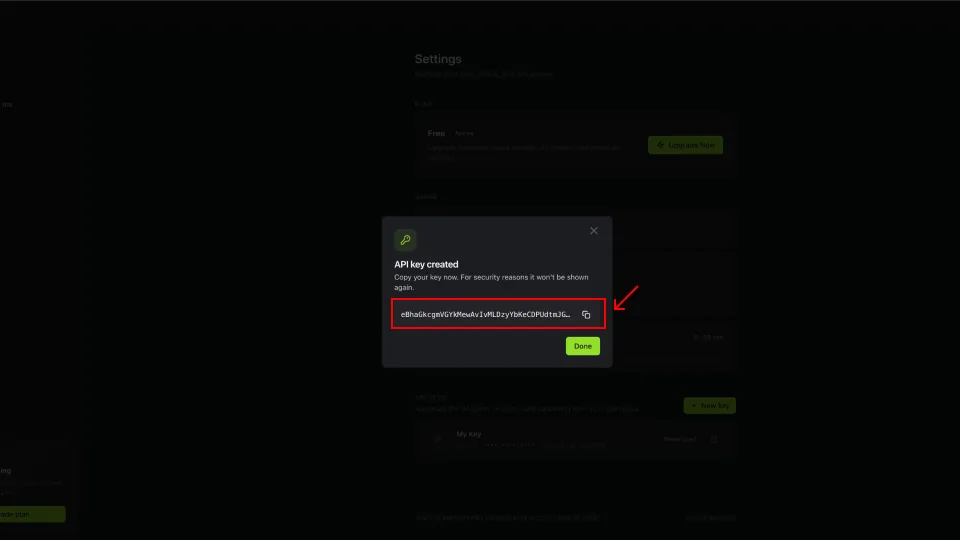
The full key is shown once. Click the copy icon and store it somewhere safe, a password manager or a .env file. If you close the dialog without copying, create a new key. Rendley cannot show this one again.
Most clients accept the key in a dedicated field. If you are configuring the request yourself, send it in this header. The Bearer prefix is required:
Authorization: Bearer YOUR_RENDLEY_API_KEYTreat it like a password. Whoever has it can use your account and spend your credits.
To rotate a key, create the replacement first, update the client, and then delete the old key. Deletion takes effect immediately.
Connected, but asked to upgrade
Connecting works on any plan, including Free. Editing and exporting require a paid Rendley plan.
On a free plan, you can sign in, browse projects, and check your account. An editing request returns an upgrade message instead of starting the edit.
An upgrade message can look like a connection problem, but it means the configuration is working and the account needs a paid plan.
Checking it worked
Ask the client something only your account would know:
List my Rendley workspaces.
If your workspaces come back by name, you are connected.
Before you start work that may use credits, you can also ask:
What plan is my Rendley account on, and how many credits are left?
Sharing this with a team
Connections are tied to an account. The person who signs in, or the account that owns the API key, is the identity Rendley uses for every request. Each teammate should connect with their own Rendley account.
Do not share an API key with a colleague. It gives them access to your account and credits.
To cut off a client you no longer use, disconnect it there, or delete the key it was using.
Something not working? Troubleshooting covers the usual causes.
What to read next
- Introduction shows how Rendley goes from source files to an exported video.
- Connect your AI client is the setup for Claude, ChatGPT, Codex and other clients.
- Automation connector covers the setup, the pauses and export settings.
- API authentication covers using the same key against Rendley’s REST API.